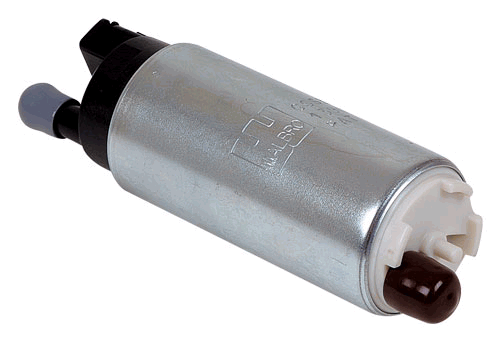
Mitsubishi Eclipse/Galant/Stratus aftermarket Warlboro fuel pump install.
This installation applies to the following vehicles.
- 99~2003 Galant
- 2000~2005 Eclipse
- 2001~2005 Stratus
- 2001~2005 Sebring
Before you plan to do this install, we HIGHLY recommend that your gas tank is below a 1/4 of a tank, otherwise you will have a very difficult time getting the entire fuel tank assembly back in.
Tools Required:
Flashlight
Dremel with a sanding bit
Rubber mallet + screw driver
Silver sharpie, white out or anything that can draw a visible mark on black plastic.
Phillips head screw driver
Needle nose pliers (preferably 90 degree needle nose that are great for hose clamps)
WD-40 or a dab of Motor Oil
Goggles
Bucket
Note: If your fuel pump came with a DSM install kit, you will not use anything from that kit including the new pickup sock that comes with it. You will reuse the stock pickup sock.
1. Proper Ventilation:
Working with fuel is can not only get to the senses but cause you to gag so roll down all your windows, open your hatch, and your garage.
Don’t smoke within 50 feet of your car
2. Remove your rear lower seat cushion:
There are two tabs at the crotch area that you simply pull to release the seat from the top of the gas tank.
Note: You will need to thread your rear seat belt locks through the seat as well, so take care not to be too rough with it.

3. Remove the lid plate:
In the center there will be a square plate held on by 4 self tapping screws with a cable going to the center of it.
Remove the 4 screws and pull the cable off of the plate on the front corner driver’s side of the plate.
Pull up the plate and there will be two harnesses that you will need to disconnect.
Disconnect those harnesses and you should see this:

4. Removal of the fuel return line and the fuel feed line.
Be very careful with the fuel feed line. If your car has not been sitting for a day or so because it will be pressurized and you will inevitably have gas spray in your car and it will leak out onto the floor. It is advisable to wear some protective lenses for that step.
4. Mark the location of the black ring for proper reinstall
At this point in time observe the fuel tank assembly, you will see a triange (the one pictured above is green), that is a reference pointer. Since it is difficult to see the mark on the black ring which holds the assembly in the gas tank, take a silver sharpie or something that can make a mark on black plastic to mark where the black ring will end up once you screw it back in during reinstallation.
5. Remove the black ring that encircles the fuel pump assembly.
The proper way to remove this is to use the special Mitsubishi tool you would typically use to hold your crank pulley in place while you are unbolting it except it has specific attachments to properly loosen and unscrew it from the pump assembly. Although, if your like the rest of us DIY 3Gers, you don’t have one, so a flat head or Phillips head screw driver and a rubber mallet will have to do the trick to remove the ring. Be careful not to preserve the humps in the ring as you can literally chip them off if you hammer on a single hump too much. Removing the black ring from that tight area might be tricky, so tuck the harnesses and the hose into the space underneath the sheet metal and it will come out a lot easier. Don’t worry, those hoses and harnesses are easy to retrieve.
6. Remove the fuel pump assembly from the gas tank.
For this part, put a bucket right next to the gas tank because the fuel pump assembly holds a bit of fuel in it. When pulling it out be VERY careful of the fuel sending unit “bobber” which hangs below the assembly. You will have to “C” the assembly out of the gas tank and put it right into the bucket. The more gas you spill on this step, the longer you will have that gas smell in your car.

7. Take the fuel assembly apart.
Note: Fuel filter is pictured above as the black housing in which holds the fuel pump.
Take the fuel pump/fuel filter out of the fuel reservoir. There are 3 tabs located around the top for this. Once you remove the fuel reservoir, dump all the excess gas out and maybe towel it out so you don’t make too much of a mess in your well ventilated work area. Disconnect the electrical connections from the cap of the fuel assembly and pull the fuel filter/fuel pump away from the cap by pushing in the two tabs on the each side of the sliders. Also very important that you disconnect the electrical connection to the top of the fuel pump as well.


8. Remove the fuel pump from the fuel filter.
Again, insure that you have disconnected the electrical harness from the top of the fuel pump, then remove the clip that holds the fuel pump into the fuel filter. Since the new fuel pump is longer than the stock fuel pump, the clip will no longer be used and you may place it to the side, or throw it away. Pull the fuel pump out of the fuel filter. The stock fuel pump is a gold color, so don’t worry about mixing it up with your brand new shiny 255lph fuel pump, but put the old fuel pump to the side or throw it away. On the stock fuel pump you should have a black crown, remove that crown and put it on the new fuel pump. The grommet should have stayed in the filter, if it came out, put it back in.

9. Remove the fuel pickup sock and dremel it to fit
This is where the magic happens and is a very important step in proper the proper fit of the fuel pump when it goes back into the fuel assembly. Take a flat head screw driver and pry off the metal o-clip holding on the pickup sock assembly to the bottom of the fuel pump, you will no longer need this. Next pull off the pickup sock, and remove the metal o-ring and keep it handy as you will need that again. Dremel the tube of the pickup sock, or sand it down flat until you sand it down mid-way through the tab. Also, you may remove the tab for a more flush fit to the new fuel pump. (See picture below). As you are slowly dremeling the tube on the sock down, fit the fuel pump into the fuel filter with the fuel sock and put the fuel filter/fuel pump assembly and put it back into the bucket and insure that all 3 tabs clasp properly. If one or more tabs do not clasp properly, then you need to take more off, if you get a perfect fit, push down on the fuel pump, if it moves more than a couple of millimeters up and down then you took too much off and you will need to get a new stock fuel pick up sock.
IMPORTANT: Be careful not to take too much off on the tube to your fuel sock or your fuel pump will not seat properly and will inevitably destroy your grommet! Keep testing it, take your time and be patient with this part.
From my experience of doing a few of these, I sand the tube down until I have passed half way through the tab, removed the tab and have gotten a perfect fit on the first try. Again, just take your time, be patient and keep reassembling and testing the fit until it is perfect.
Just a FYI, if you feel the pickup sock you will feel that it has a hard plastic skeleton on the inside of it, this will prevent it from collapsing against the bottom of the fuel reservoir sealing off the fuel pump from getting fuel. This is what we use to our advantage to create the snug fit we need between the fuel pump and the bottom of the fuel reservoir.

10. Reassemble the fuel pump assembly
Once you have tested that the fuel pump is properly fitted to the fuel pump assembly now you are ready to reassemble the entire unit.
As an option, you can widen the hole of the fuel pickup line that clips to the bottom of the fuel pump assembly another 1-2mm to insure that it can pickup more fuel. Another tip, is to also drill a few holes in the bottom of the reservoir like the Mustangs have stock so that the fuel pump does not have to fully depend upon the pickup line for it’s fuel source.
a. If your grommet came out of your fuel filter, insure that it is properly greased up for a good seal. In the event that your grommet stayed in the filter, as a preventive measure spray some WD-40 or put some motor oil on it for a proper seal.
b. Insert your fuel pump with the crown into the grommet
c. Take your freshly modified pickup sock and slide the steel ‘o-ring’ back onto it and reattach it to the bottom of the fuel pump. Observe the direction that the “moon” shape is fitted properly to the same direction as it would be when it goes back into the fuel reservoir.
d. Seat the fuel filter/fuel pump assembly into the fuel reservoir again insuring all tab’s properly clasp like the stock setup.
e. Position the floating spring and the spring that goes around the pickup line from the cap of the fuel pump assembly and connect all the electrical connections and reconnect the pickup line to the outside of the fuel reservoir like it was when you took it apart. If you have a 2001+ you will have the metal sliders which you should attach to the fuel filter first before putting it back onto plastic rails.
f. Once it is all put back together insure that all connections are connected, all tabs are tabbed, and that the unit can open and collapse.


11. Reinstall the fuel pump assembly back in the car.
A very important step in this process is to pull the black grommet off that encircles the entire top of the fuel assembly off and put it on the gas tank first, or pull the grommet down to the bottom of the fuel pump assembly and on it’s way back in insure that it fits around the lip of the gas tank all the way around before seating the fuel pump assembly back in the car. If you do not do this right, you will leak gas after your next fill up. (We learned the hard way). Pay attention that the triangle arrow on the fuel pump assembly is pointing towards the driver’s side like it was when you pulled it out of the car.
You may need a second hand to push down on the fuel pump assembly to keep it sealed into the gas tank while you maneuver the black ring back in and start catching the threads. Screw the black ring back in, it should be about 2 and half turns until the arrow triangle on the fuel pump assembly matches back up with the mark on the black ring itself. Once you think it’s in there properly, check to insure that the ring is flush against the fuel pump assembly and you didn’t install it crooked. Also push down on the fuel pump assembly, if it moves up and down at all, you will need another turn. If you are not able to match the arrow back up with your mark on the black plastic ring then the grommet is not properly seated and it may be getting pinched improperly.
Reattach your fuel lines, reconnect your electrical harnesses and screw the lid plate back down over top of the hole. Your fuel feed line should be properly clipped in, and the fuel return should be all the way on with the hose clamp. Reinstall your seat, and do not forget about pulling your seat belt locks up through the seat before fully pushing it down and locking it into the clips.
12. Test it and what to expect.
Simply just start the car and see if it runs for about 30 seconds
For the first day or so of driving the car you may not actually hear the fuel pump, but it will indeed start making a humming noise in your back seat. This is normal, and you become so accustomed to the sound that you will be able to hear if a DSM has installed one from about 20 feet away if they have their car idling.
For the first couple of times the car will crank right up on the first crank, it’s a beautiful thing but it eventually goes back to what you are normally used to on the crank up.
You will indeed run a little richer, but most importantly go tot he dyno and insure everything is on the up and up with your fuel system before making any hard runs with the car. Not only does this give you peace of mind, it may save your engine!
If for some reason after the install your car takes forever to crank up like you begin to wonder if your battery is going, you will need to inspect your grommet to insure that it is not torn, ripped or damaged. A grommet alone will wreak havoc on a fuel system, and will become a nightmare. Hopefully with this method of the install you will never have to face that, but if you do, see the section about properly dremeling down the fuel pickup sock to insure you get a proper snug fit with the fuel pump.
What about the plastic arm that runs from the return to the elect. wiring next to the passenger side looks like you have to cut the tape on the wiring to be able to remove the pump? Does not look like this return connection can be removed from the top of the pump.
Same question is Davehow do you remove that white clip and the wire harness so that you can get the black ring off appreciate your answer thank you
Extremely well written, but you images do not work.
Thank you Dillon, all fixed!
Thanks for the article. It came in handy. I’ve removed gas gauge senders and in tank pumps before but this was the first one that was a screw top. Your comments on removing the ring were helpful. The ring was a real bear to remove. It was very tight and required a lot of hammer strokes for the first turn and a half. Lubing both the grommet and the ring with Vaseline helped a lot with reassembly. I used a small flat blade screwdriver to make sure that the grommet was seated properly by tucking in the lip as it was inserted into the tank.
looking into doing this in a week or so, just wondering if there is a seperate filter that needs to be purchased with the pump, or if the filter is just the intake screen. cant find a definitive answer anywhere, and if ive goten it open, i would like to replace any and all parts that would be due. also, was told that there is a gromet or gasket that “must” be replaced, and cannot be reused. is this so, and is it the grommet you described in the last section? thanks!
Can you guys provide a step by step on how to actually replace the pump? Like the wiring and all that good stuff
Hi and thank you for this post. I replaced the fuel pump module and reused the housing. There is a plastic fitting that slides into a clip that I’m not sure about. Is there piece missing in my photo at the link below? 2005 Dodge Stratus R/T
https://drive.google.com/file/d/0B-w0bzqy0nBhZHRuSGlKeVMtYjA/view?usp=sharing
I replaced my fuel pump and reused the housing. It went pretty well, but I haven’t started the car yet. It looks like there may be a piece missing or maybe I just don’t understand how it works. Please see the photo at the link and let me know if it looks correct.
Is there any chance you have a picture of said grommet I’m having issues with mine restarting( or lack there of). It’s the ribbed one correct?
And what exactly do you mean by wreaking havok….who knows if I’ll even get a response if you can give me more insight that’d be amazing
Hey Robert, yes the ribbed one would cause an issue with getting started as it could break a seal to provide effective delivery of fuel to your fuel rail.
I have a 2003 Dodge Stratus.Looking under the back seat ,I do not see any “Lid Plate”